In this tutorial I’ll show you how to add Ktlint to your Android project and also how to configure it.
You can run it from the command line as described here. I’ll be using an integration plugin so we can run it directly from Gradle. If you want to setup it differently, there are more steps in the plugin page.
In your app/build.gradle add the plugin:
plugins {
  id "org.jlleitschuh.gradle.ktlint" version "<current_version>"
}
In your build.gradle add the dependency:
buildscript {
    repositories {
        mavenCentral()
    }

    dependencies {
        classpath("org.jlleitschuh.gradle:ktlint-gradle:12.0.3")
    }
}
That’s it for the setup. If you want to make sure Ktlint is setup correctly you can run ./gradlew ktlintCheck. That will check your project for formatting issues.
Now let’s configure Ktlint, in your root folder create a file called .editorconfig.
Inside you can customize which rules you want to disable
root = true

[*.{kt,kts}]
ktlint_code_style = ktlint_official

# https://pinterest.github.io/ktlint/1.1.1/rules/standard/#annotation-formatting
ktlint_standard_annotation = disabled

# https://pinterest.github.io/ktlint/1.1.1/rules/standard/#no-empty-first-line-at-start-in-class-body
ktlint_standard_no-empty-first-line-in-class-body = disabled
In this example you can see I disabled 2 rules. You can find all rules here.
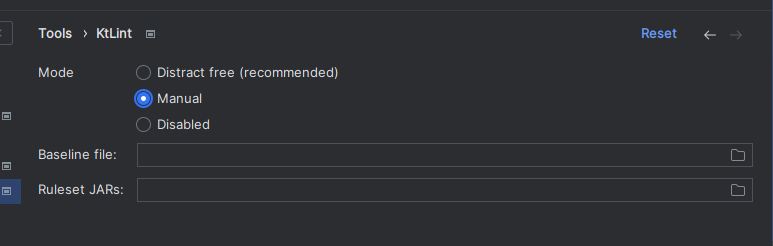
If you want to disable a rule and you don’t know what it’s called you can install the Ktlint plugin in Android Studio.
After you install the plugin, change the “Mode” to “Manual”
Now you should see a yellow underline in the code that doesn’t follow the enabled rules.
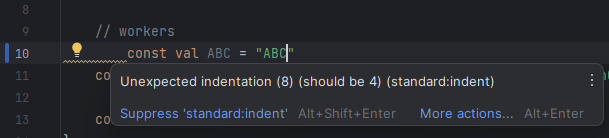
In this case we can see the the rule here would be indent.
If you have any comments or suggestions, please reach out to me on Twitter.
Photo by tatonomusic on Unsplash