Today we’ll be taking a look at some new camera functionalities provided by the Camera Extensions API. It’s supported by Camera2 and CameraX.
Camera2 was introduced in Android 5.0 (Lollipop), it offers deep control over the camera, letting developers adjust settings like manual focus, exposure, ISO, and capture RAW images. It’s ideal for advanced apps but can be tricky to use.
CameraX is part of Android Jetpack and supports Android 5.0 too, CameraX simplifies camera development. It supports common use cases like Preview, Image Capture, and Image Analysis with less code. CameraX also manages device compatibility, making it easier to use across Android devices.
The new functionalities we’ll be using today are:
- Night: Makes photos look better in low light. The camera takes a few pictures at different brightness levels and combines them into one. This takes a few seconds, so you to need keep the phone steady.
- Bokeh: Makes the person in front look clear and sharp while the background is blurry. It’s great for taking portraits with a soft background.
It’s not supported on all devices, here’s a list of supported devices. I’ll also be using CameraX only.
Night
Let’s start by implementing something that can preview the camera.
def camerax_version = "1.4.1"
implementation "androidx.camera:camera-core:${camerax_version}"
implementation "androidx.camera:camera-camera2:${camerax_version}"
implementation "androidx.camera:camera-lifecycle:${camerax_version}"
implementation "androidx.camera:camera-view:${camerax_version}"
implementation "androidx.camera:camera-extensions:${camerax_version}"

implementation "com.google.accompanist:accompanist-permissions:0.37.0"
I’m also using accompanist-permissions to request the camera permission directly in Compose.
<uses-feature android:name="android.hardware.camera.any" />

<uses-permission android:name="android.permission.CAMERA" />
<uses-permission
    android:name="android.permission.WRITE_EXTERNAL_STORAGE"
    android:maxSdkVersion="28" />
Adding android.hardware.camera.any makes sure that the device has a camera. Specifying .any means that it can be a front camera or a back camera.
@OptIn(ExperimentalPermissionsApi::class)
@Composable
fun App() {
    MaterialTheme {
        Surface(
            modifier = Modifier.fillMaxSize()
        ) {
            val cameraPermissionState = rememberPermissionState(android.Manifest.permission.CAMERA)

            val requestPermissionLauncher = rememberLauncherForActivityResult(
                ActivityResultContracts.RequestPermission()
            ) { _ -> } // We can ignore this because [cameraPermissionState] updates

            LaunchedEffect(cameraPermissionState) {
                if (
                    !cameraPermissionState.status.isGranted &&
                    cameraPermissionState.status.shouldShowRationale
                ) {
                    // Show rationale if needed
                } else {
                    requestPermissionLauncher.launch(android.Manifest.permission.CAMERA)
                }
            }

            if (cameraPermissionState.status.isGranted) {
                CameraPreview()
            } else {
                NoCameraPermission()
            }
        }
    }
}
The above code requests the camera permission and renders CameraPreview if it has been given. This is something very simple just for the tutorial, you should also handle the error cases in your app.
@Composable
fun CameraPreview() {
    val lifecycleOwner = LocalLifecycleOwner.current
    val context = LocalContext.current

    // Preview use case
    val preview = remember { CameraPreview.Builder().build() }
    val previewView = remember { PreviewView(context) }

    // Image capture use case
    val imageCapture = remember { ImageCapture.Builder().build() }

    LaunchedEffect(Unit) {
        val cameraProvider = ProcessCameraProvider.getInstance(context).get()
        val cameraSelector = CameraSelector.DEFAULT_BACK_CAMERA

        cameraProvider.unbindAll()
        cameraProvider.bindToLifecycle(
            lifecycleOwner, cameraSelector, preview, imageCapture
        )
        preview.surfaceProvider = previewView.surfaceProvider
    }

    Box(
        contentAlignment = Alignment.BottomCenter,
        modifier = Modifier.fillMaxSize()
    ) {
        AndroidView(
            { previewView },
            modifier = Modifier.fillMaxSize()
        )
    }
}
If you’re using Compose, you’re already importing Preview so you need to import the camera preview using an alias.
import androidx.camera.core.Preview as CameraPreviewThe Preview use case is what is used to render the image to surface so you can see it. The ImageCapture use case is what takes the picture and they work in conjunction.
In the LaunchedEffect block we get an instance of the camera provider and bind our use cases to it. Remember that we should always call unbindAll before binding new use cases.
You should be able to see your camera in your app now. Remember this doesn’t work in Compose Preview, you need a simulator or real device.
Now let’s change this code to work with the night mode extension.
Your device might have multiple cameras and the one that has night mode might not be the same one as before so you might see a different image, on my device it’s zoomed in.
I only changed the CameraPreview composable so we’ll go over that part.
@Composable
fun CameraPreview() {
    val lifecycleOwner = LocalLifecycleOwner.current
    val context = LocalContext.current

    val resolutionSelector = remember {
        ResolutionSelector.Builder()
            .setAspectRatioStrategy(AspectRatioStrategy.RATIO_16_9_FALLBACK_AUTO_STRATEGY)
            .build()
    }

    // Preview use case
    val previewView = remember { PreviewView(context) }
    val preview = remember {
        CameraPreview.Builder()
            .setResolutionSelector(resolutionSelector)
            .build()
    }

    // Image capture use case
    val imageCapture = remember {
        ImageCapture.Builder()
            .setResolutionSelector(resolutionSelector)
            .setPostviewEnabled(true)
            .setPostviewResolutionSelector(resolutionSelector)
            .build()
    }
    ...
}
I added a ResolutionSelector so the output image is in 16:9 format if possible. I also set setPostviewEnabled to true so we get a temporary image while the final version is being processed.
@Composable
fun CameraPreview() {
    ...
    LaunchedEffect(Unit) {
        bindCamera(context, lifecycleOwner, preview, imageCapture, previewView)
    }
    ...
}

private fun bindCamera(
    context: Context,
    lifecycleOwner: LifecycleOwner,
    preview: CameraPreview,
    imageCapture: ImageCapture,
    previewView: PreviewView
) {
    val cameraProvider = ProcessCameraProvider.getInstance(context).get()
    val cameraSelector = CameraSelector.DEFAULT_BACK_CAMERA

    val extensionsManager = ExtensionsManager.getInstanceAsync(
        context, cameraProvider
    ).get()

    cameraProvider.unbindAll()

    try {
        if (extensionsManager.isExtensionAvailable(cameraSelector, ExtensionMode.NIGHT)) {
            val nightCameraSelector = extensionsManager.getExtensionEnabledCameraSelector(
                cameraSelector, ExtensionMode.NIGHT
            )

            cameraProvider.bindToLifecycle(
                lifecycleOwner,
                nightCameraSelector,
                preview,
                imageCapture
            )
        } else {
            cameraProvider.bindToLifecycle(
                lifecycleOwner,
                cameraSelector,
                preview,
                imageCapture
            )
        }

        preview.surfaceProvider = previewView.surfaceProvider
    } catch (e: Exception) {
        Log.e("CameraPreview", "Error binding camera", e)
    }
}
I moved the camera binding code to a new method so it’s easier to work it. Now we need to call ExtensionsManager.getInstanceAsync to get the extensions manager and then check if the night mode extension is available in the device. You need to handle the else case because not all devices have it. If night mode is available we need to call extensionsManager.getExtensionEnabledCameraSelector so it returns a camera selector that supports night mode.
@Composable
fun CameraPreview() {
    ...
    CameraContainer(previewView, imageCapture)
}

@Composable
private fun CameraContainer(
    previewView: PreviewView,
    imageCapture: ImageCapture,
) {
    var captureProgress by remember { mutableIntStateOf(0) }
    var previewBitmap by remember { mutableStateOf<Bitmap?>(null) }
    var finalBitmap by remember { mutableStateOf<Bitmap?>(null) }

    Box(
        contentAlignment = Alignment.BottomCenter,
        modifier = Modifier.fillMaxSize()
    ) {
        previewBitmap?.let { bitmap ->
            Image(
                bitmap = bitmap.asImageBitmap(),
                contentDescription = "Preview",
                modifier = Modifier.fillMaxSize()
            )
        } ?: AndroidView(
            { previewView },
            modifier = Modifier.fillMaxSize()
        )

        Column(
            horizontalAlignment = Alignment.CenterHorizontally,
            modifier = Modifier.padding(bottom = 4.dp)
        ) {
            if (captureProgress > 0) {
                Text(
                    "Don't move your camera ($captureProgress%)",
                    color = Color.White,
                    modifier = Modifier
                        .padding(2.dp)
                        .background(Color.Black)
                )
            } else {
                Button(
                    onClick = {
                        imageCapture.takePicture(
                            Dispatchers.Default.asExecutor(),
                            object : ImageCapture.OnImageCapturedCallback() {
                                override fun onCaptureSuccess(image: ImageProxy) {
                                    captureProgress = 0
                                    previewBitmap = null

                                    finalBitmap = image.toBitmap().rotate(90f)
                                    image.close()
                                }

                                override fun onPostviewBitmapAvailable(bitmap: Bitmap) {
                                    previewBitmap = bitmap
                                }

                                override fun onCaptureProcessProgressed(progress: Int) {
                                    captureProgress = progress
                                }

                                override fun onError(exception: ImageCaptureException) {
                                    Log.e("CameraPreview", "Error capturing image", exception)
                                    captureProgress = 0
                                    previewBitmap = null
                                }
                            }
                        )
                    }
                ) {
                    Text("Take picture")
                }
            }
        }

        finalBitmap?.let { bitmap ->
            Image(
                bitmap = bitmap.asImageBitmap(),
                contentDescription = "Final",
                modifier = Modifier.fillMaxSize()
            )
            Button(
                onClick = { finalBitmap = null }
            ) {
                Text("Take another picture")
            }
        }
    }
}
Now I moved my camera code to a new Composable and added a few things to it. I added these 3 new variables.
var captureProgress by remember { mutableIntStateOf(0) }
var previewBitmap by remember { mutableStateOf<Bitmap?>(null) }
var finalBitmap by remember { mutableStateOf<Bitmap?>(null) }
captureProgress represents the progress to process the image. It takes from 1-3s on my device depending on how dark the image is. You can use this to show a progress bar or something like that.
previewBitmap is the bitmap returned while the final image is being processed. You can show this to the user or ignore it.
finalBitmap is the final image that was processed and should look much brighter.
You might notice that I had to call finalBitmap = image.toBitmap().rotate(90f) to get the image in the right orientation.
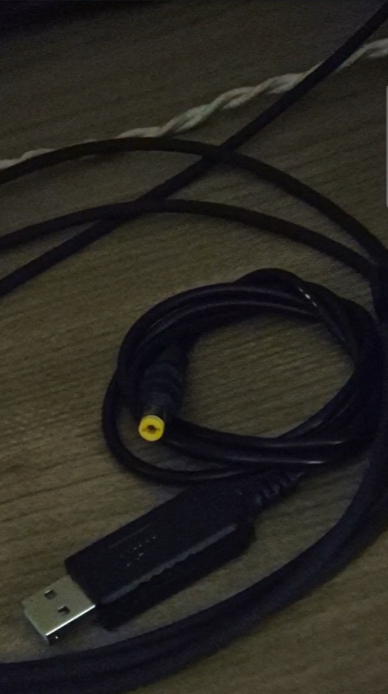
Here’s what the final version look like:
| Preview | Postview | Result |
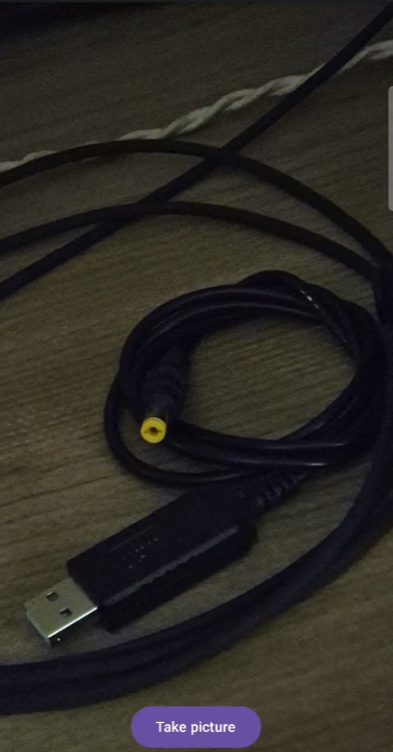 | 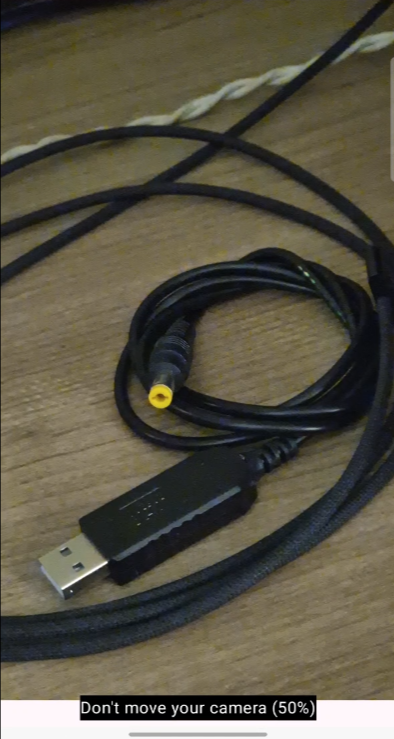 |  |
You can see there’s a very big difference compared the the initial image.
If you want to customize the extension a bit you can use CameraExtensionsControl.setExtensionStrength. It accepts a number for 0 to 100 that controls how much the extension affects the image.
val camera = cameraProvider.bindToLifecycle(
    lifecycleOwner,
    nightCameraSelector,
    preview,
    imageCapture
)

val controlControl = extensionsManager.getCameraExtensionsControl(camera.cameraControl)!!
controlControl.setExtensionStrength(50)
Right now it’s not possible to know if night mode will be used or not. They’re working on adding a new API to expose that. You can learn more about it here.
Now let’s move on to another extension.
Bokeh
This is basically what the known portrait mode is. It blurs the background while keeping the main object in focus.
To get it to work you just have to replace ExtensionMode.NIGHT with ExtensionMode.BOKEH.
if (extensionsManager.isExtensionAvailable(cameraSelector, ExtensionMode.BOKEH)) {
    val bokehCameraSelector = extensionsManager.getExtensionEnabledCameraSelector(
        cameraSelector, ExtensionMode.BOKEH
    )
I tried the bokeh mode and it worked sometimes, I was only able to get it to blur the background when a person was in front of the camera, not a generic object. The blur quality was not good either.
I don’t think it’s ready for a production app yet.
I hope you enjoyed this article, feel free to contact me if you need anything. See you next time.
Photo by Robert Shunev on Unsplash
https://android-developers.googleblog.com/2024/12/instagram-on-android-low-light-photos.html